This is an article and recording from our archives first posted in 2013. Listen to the audio recording of Tom and me discussing techniques that outdoor cyclists might employ but that indoor cyclists should avoid.
You hear people like Tom Scotto, Gene Nacey, and me, as well as many indoor cycling programs and their master instructors, preaching the benefits of keeping it real and sticking to authentic cycling techniques when training your students in your classes.
Yes, it is your obligation as the leader of the class to provide a safe and effective workout for everyone in your studio. Tom and I have both noticed that some instructors will say things like “A cyclist would never pedal lower than 60 rpm” or “A cyclist would never hover.” Another common phrase is “If you don’t do out outdoors, you should never do it indoors.”
But what if cyclists DO sometimes do these things? It’s important to know why we should not perform certain movements or techniques indoors, not deny that they exist in the cycling world. So we decided it would be a good idea to discuss those techniques that might be valid training for outdoor cyclists or a valid position on a bike outdoors, but that are not recommended for the general population in the cycling studio, especially on bikes that don’t move. By “don’t move,” we don’t just mean they don’t travel forward, but also that they don’t flex, bend, or rock side to side like a bicycle does outdoors.
In this recording, we give you the reasons these techniques may be valid outdoors and the reasons they are contraindicated or unwise indoors.
In short, these techniques are not advised indoors due to one or more of the following reasons:
- Some of these techniques are used by elite cyclists to prepare them for grueling racing conditions. These athletes are starting from a base level of fitness that is beyond most of our indoor cycling students’, even our “very fit” ones. They have many years of experience, they have highly developed technical skills, and they have built up the endurance, strength, and power needed to perform these techniques without risk of injury. Not so for the typical cycling student indoors.
- The mechanics of the indoor bicycle are not exactly the same as a road or mountain bike outdoors that is free to move. The flywheel adds some assistance to the pedaling motion, especially with very low or no resistance. Most indoor bikes don’t move and even the ones that do (as in RealRyder’s side-to-side motion) still don’t accurately simulate many of the qualities of a freely moving bicycle. Techniques like very fast sustained cadences (over ~120 rpm) on a solid bike, even a road bike locked into a trainer, rattle the bike frame. Because they aren’t dissipated in the movements of the bike like they would be outdoors, those forces are transferred to the body, especially the joints. The higher the cadence, the greater the risk. On the other end of the resistance spectrum, with excessively high resistance efforts that force riders to pedal at very slow cadences (<55 rpm), the risk on the joints and musculature is high to start, but is exacerbated when the rider strains against a bike that doesn’t move or flex. Outdoors, you can rock your bike side to side when the grade gets very steep. This rocking motion positions the rider’s weight directly above the pedal, allowing them to apply force more effectively as they push down.
- Bike fit. While bike fit is always important, these techniques require a custom-fit bike, and there is no room for “close enough.” Elite cyclists will pay thousands of dollars for a bike that fits them very well. They can perfect that fit using lasers and changing components, such as a shorter or angled stem. This in turn increases their performance potential. We cannot do that with indoor bikes and often rely on “close enough.” Even if you take the time to fit your students as close as possible, it still isn’t custom fit to them.
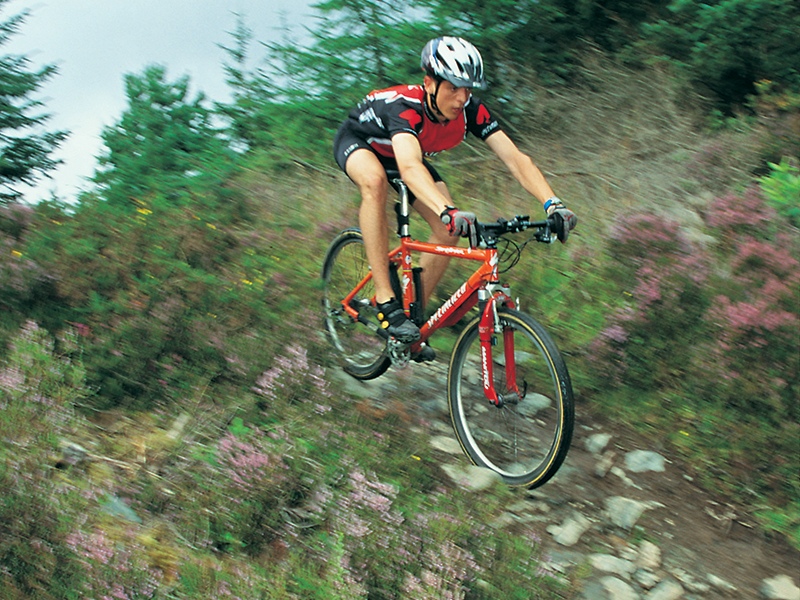
- The angle of the bike. Outdoors on a steep uphill, where the front wheel is considerably higher than the rear wheel, you would move your hips forward to find the center of gravity when you stand. This allows you to push downward on the pedal in a straight line with your full body weight, whereas if your center of gravity is behind the bottom bracket, your force potential is diminished. In the other direction, on a steep downhill on a mountain bike, you push the hips back to avoid going over the bars; this is essentially a “hover” as they’re described indoors. The difference outdoors is that you aren’t pedaling while doing this and you are maneuvering the bike underneath you as you descend. Neither of these exaggerated body positions makes any sense indoors because no matter what you do with your body, gravity is still straight down. Moving the body fore and aft alters your relationship to gravity and to the pedals and bottom bracket, decreasing your ability to transfer the force to the pedals properly.
The two images below are examples of how the angle of the bike relative to gravity will affect how riders adjust their position. In the first image of a steep uphill, the standing cyclist’s hips are far forward of the saddle, close to the handlebars. However, notice that his center of gravity is still straight up and down and positioned slightly ahead of the bottom bracket. It would not be if he was in this position on a level road; in fact, he couldn’t maintain this awkward position for long and would quickly shift his weight back.
To see this better, tip this image to the right (literally, tip your computer, phone, or tablet) so that the white line underneath the rider is level from where you are viewing this image. It quickly becomes apparent that the rider’s center of gravity—a line drawn straight down from the center of his hips—is now much farther in front of the bottom bracket. That is unsustainable. (Note that a sprinter might do this to overcome massive resistance with their body weight but that would only last a few seconds.)
In this image, the mountain biker is “hovering,” but he’s doing it for a very important reason that is only possible outdoors. His hips extend way beyond the back of the saddle so he won’t fly over the bars while screaming down the bumpy descent. You can be sure he’s not pedaling and that he is maneuvering the entire bike underneath him as he descends. No amount of “practicing” this position indoors will help your ability to do this outdoors—it requires not just technical skill but also a lot of guts.
If either of these riders tried to attain these positions on a bike on a flat surface—such as is always the case on an indoor stationary bike—you can imagine the awkward distribution of weight, the strain on the joints, and the inability to pedal properly.
Listen to the recording to hear about other common but unwise techniques often seen in an indoor class, and let us know in the comments if you have any questions about other techniques you’ve seen employed in cycling classes.
[box type=”download”]Click here Listen to the audio or download the mp3 to save it to your computer. [/box][/show_if]


Great post on the angle and positioning for climbing! I just talked about this with a fellow instructor. As the front of the bike moves upward on a climb, you must move your body forward to stay over the pedal cranks. Not so on an indoor bike. If you show video footage of cyclists climbing to indoor cycling students, you must be sure to point this out.
How exactly do you teach a spin up? Is it different from a sprint?
I do spin-ups all the time with my classes. As long as you already have the basics in place, such as good form, students who are familiar with higher cadences, understanding of the resistance required, etc. I don’t think they are bad at all.
I will first do some cadence drills up to the highest cadence I want them to reach, so they have an understanding of what that cadence feels/looks like, such as 100 or 110 rpm. Then I’ll move into the spin-ups or accelerations, say from 80–110 rpm over 30 seconds, then 15 seconds, then maybe 7-10 seconds.
If the instructor does them with no resistance, then it’s not recommended.
Great question!
Are Spin-ups good on a stationary bike? Not for the regular class, but let’s say for personal training? I ride on the cycleops 400 pro which simulates very well a road bike configuration.