
How to Coach Resistance in Your Indoor Cycling Class, Part 1: Why “Add a Turn” Misses the Mark
Coaching resistance is one of the most essential—and often misunderstood—skills in indoor cycling instruction. Resistance is challenging to teach well, in part because certification programs vary widely in how they approach it. Many instructors are left with inconsistent or vague guidance—or simply make up their own methods, which may not be grounded in effective coaching principles.
This five-part series is primarily designed for instructors who do not use power meters or who may not yet understand how to teach effectively with them. However, even experienced instructors who do coach with power will find value in refining how they communicate resistance, especially in situations where power data isn’t available, or during mixed-level classes.
Power meters are the gold standard for prescribing intensity and objectively guiding resistance. When you can see wattage, it becomes clear just how much resistance impacts effort. But your legs don’t stop producing force just because you’re not measuring it. That’s why developing clear, effective resistance cues matters for everyone, regardless of whether you have access to power technology.
In part 1, we’ll examine one of the most outdated and ineffective methods of coaching resistance: asking riders to “add two turns” of the knob or shift to a specific gear. Despite its simplicity, this cueing style is still surprisingly common, and it consistently falls short in helping riders apply the right amount of resistance for their fitness level and goals.
Why “Add a Turn” Is a Bad Idea
Coaching by number of turns of the resistance knob—or by gear numbers for bikes that use them—fails to consider five key variables:
1. Too Little or Too Much Resistance
Asking everyone to make the same adjustment can lead to wildly different outcomes. Some riders will end up underloaded and underperforming, resulting in lower power output and less metabolic demand. Others might overshoot, grinding against a resistance level that’s inappropriate for their strength or the duration of the interval.
A rider who struggles to complete the segment may feel like they failed—when in fact, it was the coaching that didn’t help them find the right zone for their needs.
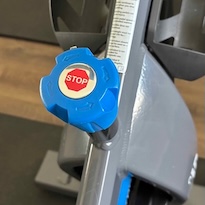
Here is a video that highlights why it’s unwise to tell the class how many turns are needed—you’ll quickly see why it depends on the rider!
2. It Leaves Beginners Lost
New riders don’t have a reference point for what resistance should feel like. If they start with the knob all the way to the left (which is common), “two turns” might not even bring them to a usable baseline. They may end up pedaling too fast, driving their heart rate up while producing very little work, trying to create intensity with leg speed instead of resistance, without realizing what’s missing.
This confusion contributes to the widespread myth that indoor cycling is just “spinning your legs fast and breathing hard.” Without clear guidance, it’s easy to mistake a fast cadence and heavy breathing for high performance—even when the workload is minimal. Over time, this can lead to frustration and a lack of progress, especially if riders never experience the muscular demand that should accompany cardiovascular effort. Worse, it can reinforce bad habits that are difficult to correct later on.
3. Bike-to-Bike Variability
The idea that “two turns” equals the same increase in resistance across all bikes is simply not true. Even within the same studio, resistance can vary widely from bike to bike. Magnetic systems behave differently from friction-based systems. More importantly, wear and tear over time can create significant inconsistencies—especially if bikes are used heavily, moved often, or not regularly maintained.
What a half turn feels like on one bike might feel like a full turn—or almost nothing—on another. This means that the same resistance cue can vary drastically from bike to bike, making it nearly impossible to ensure consistent resistance across the class. This variability leads to confusion and frustration for both instructors and riders who are trying to gauge their effort accurately. Without a standardized system for adjusting resistance, riders can easily end up with too little resistance to challenge their muscles, or too much, which could compromise their form and performance.
4. It Depends on the Starting Point
The feel of a given turn (e.g., half a turn or a full turn) changes depending on how much resistance is already applied. If the resistance is set all the way to the left (easier), a full turn might not feel like much. However, if there’s already resistance on the bike, that same “one turn” can feel like you’ve hit a wall. As you progress through the resistance range, less movement of the knob is needed to feel a noticeable difference.
This is something that’s easy to spot with a power meter, but without one, many riders—especially newer ones—don’t realize that a half turn doesn’t produce the same effect across the entire resistance range. They might assume a half turn always feels the same, not recognizing that its impact depends on where they are on the resistance spectrum.
Since every rider starts at a different point on the resistance scale, based on their strength or experience, this kind of “turn-based” instruction can result in vastly different levels of intensity from rider to rider. Without clear guidance on how resistance should feel, each rider could end up at a very different place in their workout, impacting the overall effectiveness of the session.
5. Everyone Is Different
A blanket cue like “add one turn” assumes all riders are starting from the same place in their fitness and experience, but the reality is far more nuanced. Body size, strength, age, fitness level, and injury history all affect how much resistance a person can handle.
Would you hand the same set of dumbbells to everyone in a strength class? Of course not. But that’s exactly what you’re doing when you coach resistance by giving the same number of turns or gear number to every rider.
Your goal as a coach is to help each person find their appropriate load for the intended intensity, cadence, and duration. That’s what brings results—and keeps riders safe.
Looking Ahead
In part 2, we’ll look at another widely used but deeply flawed method of coaching resistance: assigning numbers on a 1–10 scale to simulate terrain. This technique, while well-intentioned, creates more confusion than clarity and often disconnects riders from the physical reality of what a “flat road” or “hill” should feel like.
Whether you teach on bikes with power meters or not, learning how to coach resistance effectively will help you create more meaningful, personalized, and successful classes for your riders. Stay tuned.
I have used a number of stidio bikes over the years. Having color/power displays is a game changer. Having a reference to FTP (even vaguely correct) allows clear repeatable class profiles.
This is so true, Howard. Normally, I believe that to get a “true” FTP number, either a 20-minute test or a ramp test should be used eventually—but the 20-min test is too hard to do for the general population and the ramp test has too many logistics for a class scenario over a few people to do correctly. However, over the years, I’ve realized that the 3-minute or 5-minute FTP test used in many classes is sufficient and at LEAST gets riders in the ballpark. Like you said, even if it’s “vaguely correct,” they’ve got something to work with, and it helps them be aware of their relative abilities and strengths.
Seeing their relative ranges on a screen (color power displays) keeps participants accountable—they are much less likely to push too hard or take off too much.
We recently got bikes with power (spinner chrono) and I am very excited to hear there will be future articles on how to incorporate power to teach intensity for students of differing fitness levels. But for now I find it very challenging to understand and communicate to my students what is happening with their HR at those higher cadences since it feels like you are working hard very even though their power may be low. Can you elaborate on that phenomenon? Thank you
Great explanations, but you left out one thing – perhaps you will address it in Part 2 – Instsructors, and possibly participants, who ride at multiple locations on different brand bikes. I teach at three gyms each with a different style bike; One has Levels 1-20 and a lever, power is by Cal/Hour (not accurate but serves as a reference of power); the second has Gears 1-24 and a lever, power is by Watts; and the third has a turning knob and power is by Watts. Looking forward to your cuing suggestions, hopefully I’m already using some, but always looking for better ways to engage my riders. Thanks!
This is a very important issue that many instructors struggle with. And again it comes down to RPE and being able to describe the level of intensity in a short, concise but clear way. Talking about resistance, I was covering a class yesterday on IC7s. I asked about injuries, any help etc Someone’s hand went up so I set him up. He was with a friend. I checked both bikes and asked if they are familiar with the console and I got a yes. Then we started warming up. I gave RPM and explained the intensity level required. Gave a colour reference, too. Then over the next 5 min I asked them 3 times to add 2 levels at a time. You can see the numbers of levels/gears on that bike. I then looked at one of the new guys. I saw his console in red and his legs barely moving. I went up to him and he was on level 80?! I was like: how did you get here?! He goes: every time you said two levels up I thought you meant 2 turns. 🙂 Sometimes you get complacent and so used to the fact people know what they are doing (more or less). Even though I say: RPM top left is 80-90. Resistance top right is going up by two, I completely forgot someone may have never seen a bike like that before and has bad habits from instructors teaching by “turns”. Even though he should have mentioned that little detail 🙂
this would make a great MCCT! =)
Ohhh..at last I see written the proper concept of “relative load”; so sorry to see how most of instructors I see (not to say on event stages too!) really do not coach properly resistance feeling!! Well done Jennifer!! I think the problem is at the basis: learning, trial & error procedure, feedback from the classes and mostly… have a “good teacher” at the beginning of your life as an instructor!
it is rather amazing that they don’t get the concept of “relative load,” isn’t it?!